Search This Blog

Showing posts with label Barbecue. Show all posts

Thursday, July 6, 2017

Snappier Grilling


The Ingredients (for 4 servings):

  • 1 whole, fresh, cleaned snapper (or any local, fresh, mild flavored fish), weighing approximately 1.3 kg (or 3 lb)
  • 120 ml (or ½ cup) of cooking grade olive oil
  • 20 g (or 2½ teaspoons) of coarse sea salt (I used Maldon salt for its briny flavor)
  • 2 lemons
  • 4 to 6 sprigs of fresh thyme (or the equivalent amount of dried thyme)
  • 4 g (or ½ tablespoon) of freshly ground black pepper
  • Salad grade olive oil

    The Method:
    1. Prepare a barbecue or gas grill to cook the fish at high heat.
    2. Rinse the fish well, pat it dry, and place it on a large platter or similar receptacle that holds the whole fish.
    3. Pour the cooking grade olive into and over the fish and rub it into the skin and into the abdominal cavity.
    4. Sprinkle a little of the salt into the abdominal cavity and the remainder onto the outer skin.
    5. Cut the lemons in quarters and take a thin slice from each of the quarters.
    6. Place the lemon slices inside the abdominal cavity of the fish.
    7. Stuff the thyme into the abdominal cavity—as much as will fit comfortably.
    8. Sprinkle both sides of the fish with the pepper.
    9. Baste the fish with the olive oil, then place it in a fish grilling basket if you have one.
    10. Place it on the barbecue or grill.
    11. Place the lemon quarters, one cut side down, around the fish on the barbecue or grill.
    12. Turn the fish when the skin starts to crisp.
    13. Turn the lemon quarters to grill the other cut surface and remove them when they are pleasantly roasted.
    14. Check the fish on both sides of the spine for doneness and remove it as soon as the flesh is opaque down to the bone.
    15. Remove the fish to a serving dish and drizzle it with salad grade olive oil. If you wish, sprinkle on a little more salt and any fresh thyme leaves that you might have left over.

      The Story:

      Strangely, for a small island in the middle of the North Pacific, there is not an abundance of fresh local fish in the markets. Opakapaka, the Hawaiian name for pink snapper, is one of the few that we see regularly. So as not to be boring, I am always looking for new ways to cook opakapaka, and I came across a simple and simply delicious recipe on the myrecipes.com website. It didn't hurt that it brought back memories of lunch in Santorini one beautiful autumn day several years ago. I changed the recipe very little here, and I have also made a variation using fillets of opakapaka when I couldn't get a whole fresh one. 

      Thursday, December 3, 2015

      Saucy BBClue

      Baby back ribs with Saucy BBClue and Popeye Pancakes

      Menu Notes:

      • This is my version of, and not very different from The Prudent Wife recipe for Barbecue Sauce with Stevia.
      • If the sauce is not all used within a week or so, it can be frozen, and thawed for later use. (I have not yet done the freeze-thaw, so cannot vouch for the taste or consistency of the sauce after freezing.)

      The Ingredients:

      • 1 large onion, weighing approximately 225 g (or 8 oz)
      • one 3 to 5-cm (or 1 to 2-inch) piece of ginger, weighing approximately 20 g (or ¾ oz)
      • 2 to 4 cloves of garlic, weighing approximately 15 g (or ½ oz)
      • 8 g (or 1 teaspoon) of salt
      • 6 g (or 2 teaspoons) of ground cumin
      • 1.5 g (or ½ teaspoon) of ground Cayenne pepper
      • 350 ml (or 1½ cups) of chicken broth
      • 1 can (170 g or 6 oz) of tomato paste, preferably Muir Glen brand
      • 1  lime
      • 60 ml (or ¼ cup) of sherry
      • stevia equivalent of 12 g (or 1 tablespoon) of sugar
      • 3 sprigs of fresh basil, weighing approximately 15 g (or ½ oz)
      • 1 small handful of fresh oregano, weighing approximately 12 g (or ⅓ oz)
      • cooking grade olive oil

        The Method:
        1. Peel and dice the onion.
        2. Grind the garlic and ginger together or grate them finely.
        3. Squeeze the lime and reserve the juice.
        4. Heat a saucepan over medium heat and add enough olive oil to lightly cover the bottom of the pan.
        5. Place the diced onion into the pan and sauté until all of the pieces are translucent.
        6. Add the garlic and ginger, stir briefly, and reduce the heat to low. 
        7. Cover the pan and allow the aromatics to simmer for 15 minutes.
        8. Add the salt, cumin, and Cayenne pepper to the pan.
        9. Turn the heat to medium-high and cook for 5 minutes, stirring frequently.
        10. Add the tomato paste and stir vigorously.
        11. Add the chicken broth and stir gently but thoroughly.
        12. Add the sherry, stevia, and lime, stir briefly, then turn the heat to low.
        13. Cover the pan and simmer the sauce mixture for 15 minutes.
        14. Strip the basil leaves from the stems and chop them finely with the oregano.
        15. Add the basil and oregano (or substitute dried equivalents) to the sauce mixture and simmer, covered, for a further 15 minutes.


          The Story:

          Although we don't barbecue very often, our daughter and son-in-law love to smoke baby back ribs. Whenever they do, my husband always has to ask for dry-rub ribs because barbecue sauces are usually heavily sugared. So I cast about the internet for ideas for a sugar-free version and found someone who had already used stevia as a sweetener in a light, but spicy sauce. Even the nondiabetics in the family like it.


          Saturday, November 29, 2014

          Smokehouse Turkey


          Menu Note:

          • Our daughter and son-in-law executed this, our first attempt at smoking a turkey, with advice from his father, an all-round barbecue and smoker expert, and from the excellent website called Smoker Cooking.

          The Ingredients:

          • 1 turkey, weighing approximately 5.5 kg (or 12 lb)

          • 1 garlic bulb
          • 20 allspice berries
          • 20 juniper berries
          • 350 g (or 1½ cups) of sea salt
          • stevia equivalent of 200 g (or 1 cup) of sugar
          • 10 bay leaves
          • 10 sprigs of fresh thyme
          • water
          • ice cubes

          • 16 g (or 2 teaspoons) of salt
          • 15 g (or 2 tablespoons) of garlic powder
          • 18 g (or 3 tablespoons) of onion powder
          • 12 g (or 2 tablespoons) of paprika
          • 20 g (or 2 tablespoons) of white pepper
          • 6 g (or 1 tablespoon) of powdered ginger
          • 8 g (or 2 tablespoons) of powdered sage
          • 120 ml (or ½ cup) of cooking grade olive oil
          • 115 g (or ½ cup) of butter
          • charcoal briquettes
          • mesquite. oak, or apple wood chunks or small logs, soaked in water overnight

            The Method:

            Brining
            1. Begin brining the non-frozen turkey approximately 2½ days before you want to serve it. (If the turkey has been frozen, allow an extra 48 hours—a total of 4½ days prior to serving—for it to thaw in the refrigerator for a couple of days.)
            2. To make the brine, first remove all of the cloves of garlic from the bulb and crush them. 
            3. Crush the allspice berries.
            4. Crush the juniper berries.
            5. Fill a large pot with water, measuring and making note of the volume used.
            6. Add the garlic cloves, allspice, juniper, sea salt, stevia, bay leaves, and thyme to the water and bring it to a boil.
            7. Allow the brine solution to cool to room temperature.
            8. When the brine is cool, wash the turkey inside and out, removing any loose fat, excess skin, and any turkey parts included in the package. 
            9. Gently slide a blunt spatula between the breast meat and the skin until the skin on both sides of the breast is separated from the meat.
            10.  Arrange two large plastic bags, one inside the other, in a rigid container (such as a recycle bin) so that the tops of the bags hang out over the sides of the container.
            11. Place the turkey into the innermost bag, making sure that the tops of both bags are still outside the rim of the container.
            12. Use ice cubes or crushed ice to increase the volume of the brine solution to approximately 9.5 l (or 2½ gal).
            13. Pour the iced brine solution over the turkey.


            14. Take the top of the inner plastic bag and tie it off tightly, making sure to expel all the air from the bag so that the turkey is completely immersed in brine.
            15. Take the top of the outer plastic bag and tie it off tightly.
            16. Refrigerate the turkey, breast down, for 24 hours. This can be done by placing the bagged turkey in a roasting pan in the refrigerator, or by packing it in ice in a large cooler.
            Curing
              1. Remove the turkey from the plastic bags and rinse it well, removing as much as possible of the thyme leaves, which stick to the skin and flesh.
              2. Place the turkey, breast up, onto a rack in a roasting pan and place it into the refrigerator for 24 hours.
              Seasoning
                1. At 9 to 10 hours before serving, remove the turkey from the refrigerator and place it on a large sheet of strong aluminum foil.
                2. Combine the salt with the powdered garlic, dried onion, paprika, white pepper, ginger, and sage and mix well.
                3. Use approximately 1 tablespoon of the mixture to dust inside the cavity of the turkey.
                4. Add the olive oil to the remaining seasoning mixture and use it to baste the turkey all over, as well as under the skin of the breast.
                5. Let the turkey rest, breast up, on the foil and equilibrate to room temperature until the smoker is ready.

                Smoking
                1. At 8 hours before serving, ignite the barbecue coals and allow them to burn until they start to turn white.
                2. Place one soaked log or the equivalent in chunks onto the coals and allow them to begin smoking. Measure the temperature in the smoking chamber or in the barbecue kettle. 
                3. When the cooking temperature reaches 107°C (or 225°F), wrap the foil around the turkey and place it, breast up, in the smoking chamber or in the barbecue rack and reclose the cover.
                4. Maintain the temperature in the smoking chamber at or slightly above 107°C (or 225°F), adding more soaked wood as necessary, and smoke the turkey for 6 hours before opening the foil. 

                Monday, October 14, 2013

                Hawaiian Huli-Huli Chicken


                The Ingredients (for 4 servings):

                • 1 whole chicken weighing approximately 2 kg (or 4½ lb)
                • 4 cloves of garlic
                • 140 g (or ½ cup) of salt
                •  2 sprigs of thyme
                • 20 g (or 1 tablespoon) of cracked black peppercorns
                • 3 cloves of garlic
                • 30 g (or 2 tablespoons) of fresh ginger
                • 1 lemon (preferably a Meyer lemon)
                • 80 ml (or ⅓ cup) of dark soy sauce
                • 60 ml (or ¼ cup) of cooking sherry
                • 30 ml (or 1 tablespoon) of sesame oil
                • Stevia equivalent of 65 g (or ⅓ cup) of sugar
                • 90 ml (or 3 tablespoons) of ketchup
                • 90 ml (or 3 tablespoons) of chili sauce or cayenne sauce
                • 5 g (or 1 tablespoon) of freshly ground black pepper

                The Method:
                1. Two days prior to cooking the chicken, peel four garlic cloves and crush them with a small tenderizer or the side of a knife.
                2. Bring to the boil a sufficient volume of water to cover the chicken completely in a bowl, for brining overnight.
                3. Add the salt, thyme, peppercorns, and crushed cloves of garlic to the boiling water, and turn off the heat. Stir until all the salt is dissolved.
                4. Allow the brine solution to cool to room temperature.
                5. Wash the chicken thoroughly and place it in a bowl that accommodates it snugly.
                6. Pour in the cooled brine solution and stir gently to distribute the herbs and seasonings evenly. Press the air out of the chicken's cavity.
                7. Cover the bowl with a fitted lid or an air-tight plastic wrap, and refrigerate for 24 hours.
                8. One day prior to cooking the chicken, discard the brine and replace the chicken in the bowl.
                9. Make the marinade by first peeling 3 cloves of garlic and the ginger, and passing them through a garlic press or mincing them finely.
                10. Wash the lemon and use a grater or zester to remove the zest and mince it finely.
                11. Add together the dark soy sauce, sherry, sesame oil, stevia, ketchup, chili or cayenne sauce, black pepper, garlic, ginger, and lemon zest.
                12. Mix the marinade ingredients thoroughly and pour the mixture over the chicken in the bowl, making sure it is thoroughly coated inside and out, and that the chicken is submerged as completely as possible.
                13. Cover the bowl with its lid or an air-tight plastic wrap, and refrigerate for 24 hours.
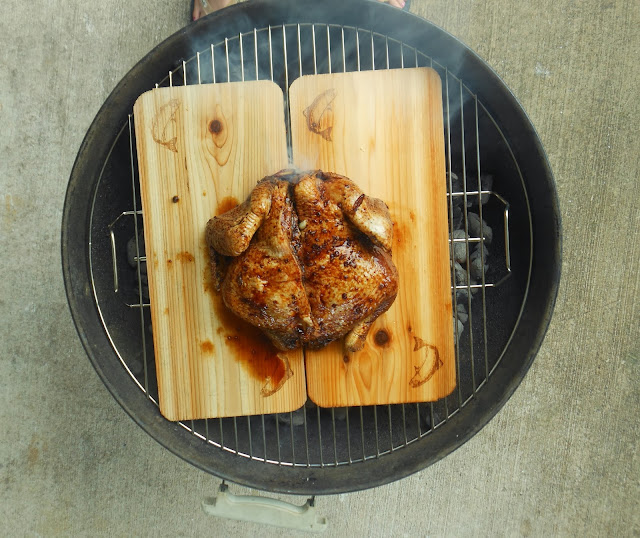
                14. Soak two cedar planks for grilling in a tub of water for 24 hours.
                15. About 3 hours before you intend to serve the chicken, light the barbecue, using a single layer of coals.
                16. When the coals are evenly hot, push them to the sides of the barbecue and place a pie-pan full of water in the center.
                17. Place the cedar planks across the grilling rack, and position the chicken on top, reserving the marinade for basting.
                18. Cover the grill, and leave all vents open.
                19. Barbecue the chicken for two hours over this low, moist heat, basting several times and turning the chicken once or twice.
                20. This chicken can alternatively be roasted at 175°C (or 350°F) for 1½ hours in the oven, and I have done it this way. It is still a tasty dish, but does not have the smoky barbecue flavor of the cedar-plank version.

                The Story:

                There is no standard huli-huli marinade; rather, each cook has his or her own mixture. This one borrows largely from a recipe on epicurious.com, with substitutions that I tinkered with over time and came up with the version above. Four of us who had this particular chicken last night agreed it was unbeatable. Thanks to J, who expertly barbecued for us.


                "Huli-huli" in Hawaiian means to turn repeatedly, implying that huli-huli chicken is properly cooked on a spit. In fact most people cook chicken parts on a barbecue. It's common to see people set up a barbecue under an awning by the roadside and put out a hand-lettered sign advertising huli-huli chicken. Even our local supermarket sports a huli-huli barbecue grill in the parking lot.


                  Thursday, October 10, 2013

                  Stick-to-Your-Ribs Beef


                  The Ingredients (for 3 servings):
                  • 1 kg (or 2¼ lb) of beef short ribs
                  • 120 ml (or ½ cup) of soy sauce
                  • 30 ml (or 1 tablespoon) of balsamic vinegar
                  • 30 ml (or 1 tablespoon) of sesame oil
                  • Stevia equivalent of 60 ml (or 2 tablespoons) of sugar
                  • 3 cloves of garlic
                  • 15 g (or 1 tablespoon) of fresh ginger
                  • 5 g (or 1 tablespoon) of freshly ground black pepper
                  • 5 g (or 1 tablespoon) of cayenne pepper

                  The Method:
                  1. Wash  the ribs under warm running water and pat them dry.
                  2. Place the ribs in a bowl.
                  3. Finely dice, grate, or press the garlic and ginger and add to the ribs in the bowl.
                  4. Combine all of the other ingredients in a small bowl or measuring cup and mix them thoroughly.
                  5. Pour the marinade mixture over the ribs, then turn each rib a couple of times until all of them are coated.
                  6. Marinate the ribs in the refrigerator for 24 hours, turning them once or twice during that time to redistribute the marinade.
                  7. Grill, broil, or barbecue the ribs for about 5 minutes on each side, or until the meat is cooked to medium-rare.


                  Sunday, July 29, 2012

                  Smokin' Mullet

                  Menu Notes:
                  • This recipe is an old family recipe—not ours: it was provided and cooked for us by the Lawson family of St. Petersburg, Florida. Thank you  James, Wanda, and Jaron for adding to our favorite dishes.
                  • Although the recipe calls for one fish per person, we cooked five mullet for four people, and used the leftovers in a delicious spread for sandwiches—also a Lawson family recipe.
                  The Ingredients (for 4 people):
                  • 4 fresh mullet, each weighing about 450 gram (or 1 lb)
                  • 4 Tbsp of olive oil
                  • 4 tsp of balsamic vinegar
                  • Salt 
                  • Pepper
                  • 1 lemon
                  • 1 small onion
                  • Barbecue coals or an equivalent heating element
                  • 1 bag (2.62 dm³ or 160 cu in) hickory chips

                  The Method:
                  1. Clean and scale the mullet if this was not done at the market.
                  2. Marinate the mullet in olive oil and vinegar, salt and pepper for 2 hours.
                  3. Soak the hickory chips in water for at least 1 hour.
                  4. Heat coals under a grill and, when they are white-hot, push them aside to make room for the hickory chips.
                  5.  Place the hickory chips in an aluminum pie dish, sprinkle a few chips over the coals, then place the pie dish under the grill near the coals.
                  6. Allow the hickory chips in the dish to heat up and begin to emit smoke.
                  7. Slice the lemon thinly.
                  8. Slice the onions thinly.
                  9. Stuff each fish with one quarter of the lemon and onion slices
                  10. Place the mullet, with their marinade, on a piece of aluminum foil large enough to cover them, and crimp the foil lightly closed around them.
                  11. Place the mullet on top of the grill, directly over the hickory chips.
                  12. Cover the grill and close the top vents to lower the heat of the coals.
                  13. Allow the mullet to smoke for 45 min, then uncover the fish and replace the grill cover.
                  14. Allow the mullet to smoke for another 15 min, or until they are reddish-gold and fork-tender.

                  The Story:

                  It's easy to eat a whole smoked mullet, so if you want to have sandwiches for lunch the next day, smoke an extra fish and put it in the refrigerator. After patiently pulling the flesh off the bones, add chopped scallion, mayonnaise, and Tabasco sauce to make a mixture similar to tuna salad—but much more tasty. I had mine in a pita pocket with arugula.